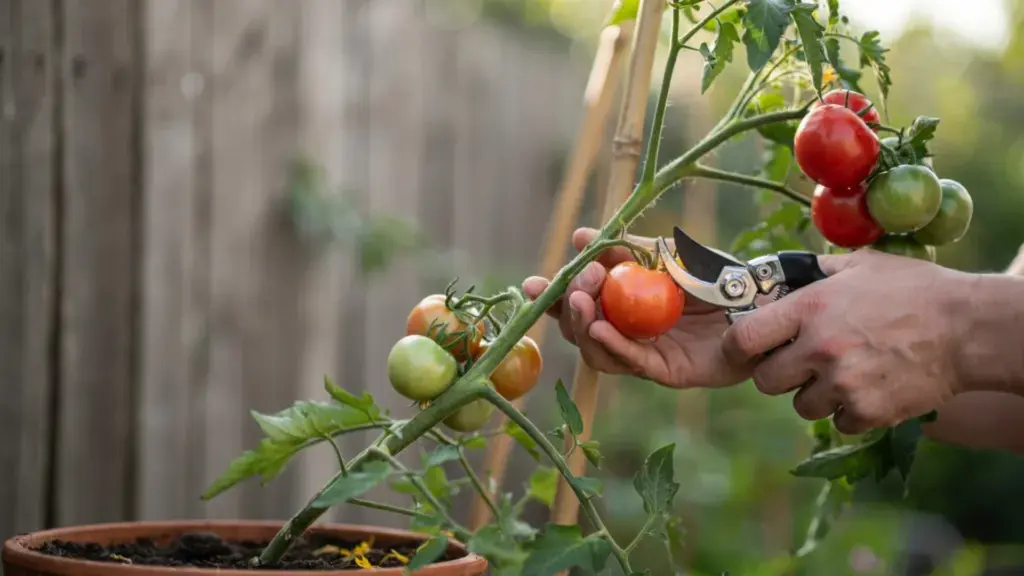
For years, I watered my tomatoes on schedule, fed them regularly, and staked every plant. The harvest still fell short.
The missing step was pruning. Done right, pruning tomato plants pushes the plant to put more energy into fruit instead of constant new leaf and stem growth.
This guide covers what to cut, when to cut it, which tools to use, and the mistakes that quietly wreck a good crop.
Why Pruning Tomato Plants Actually Matters
Tomato plants do not stop growing on their own. Left alone, an indeterminate variety will keep branching out, producing more and more stems and leaves.
The plant spreads its energy thin across all of that growth. The result is a big, leafy plant that delivers a modest harvest.
When you prune tomato plants, you redirect that energy. Instead of feeding dozens of side shoots, the plant focuses on ripening the fruit it already has.
Pruning also solves real disease problems. Lower leaves that touch the soil provide a direct path for fungal diseases such as blight and powdery mildew to reach the plant.
Removing them improves airflow around the base, which keeps the foliage drier. Wet foliage for long periods is one of the main reasons diseases spread quickly in a tomato patch.
Know Your Tomato Type Before You Cut Anything
Knowing your tomato type before you prune matters more than any other single decision. Cut back the wrong type, and you cut straight into your own harvest.
There are two main tomato types: determinate and indeterminate, and which one you grow changes everything about how you should prune.
Determinate tomatoes grow to a fixed size, set all their fruit at roughly the same time, and then stop. Pruning too aggressively on a determinate variety directly reduces your harvest. The only pruning you should do on determinate plants is removing suckers below the first flower cluster.
Indeterminate tomatoes keep growing and producing fruit throughout the entire season until frost kills them. These are the plants that genuinely benefit from regular pruning. Without it, they become unmanageable and disease-prone.
Check your seed packet or plant tag if you are not sure which type you have. Most heirloom varieties are indeterminate.
The Tools You Need for Pruning
You do not need a collection of expensive gear.
Three things will cover every pruning task:
- Sharp pruning shears for any stem thicker than your finger
- Your fingers for snapping off small suckers under 2 inches long
- Rubbing alcohol or a diluted bleach solution (1:9 ratio) to sterilize your blade between plants
Dull blades are a real problem. They crush the stem instead of cutting it cleanly. A crushed wound takes longer to heal and stays open to infection longer.
Test your shears by cutting through a piece of paper. If the paper tears instead of cutting clean, sharpen the blade before you touch the plant.
Wipe down your shears between plants every time. Fungal and bacterial pathogens easily transfer from one plant to the next via a dirty blade.
When to Start Pruning Tomato Plants
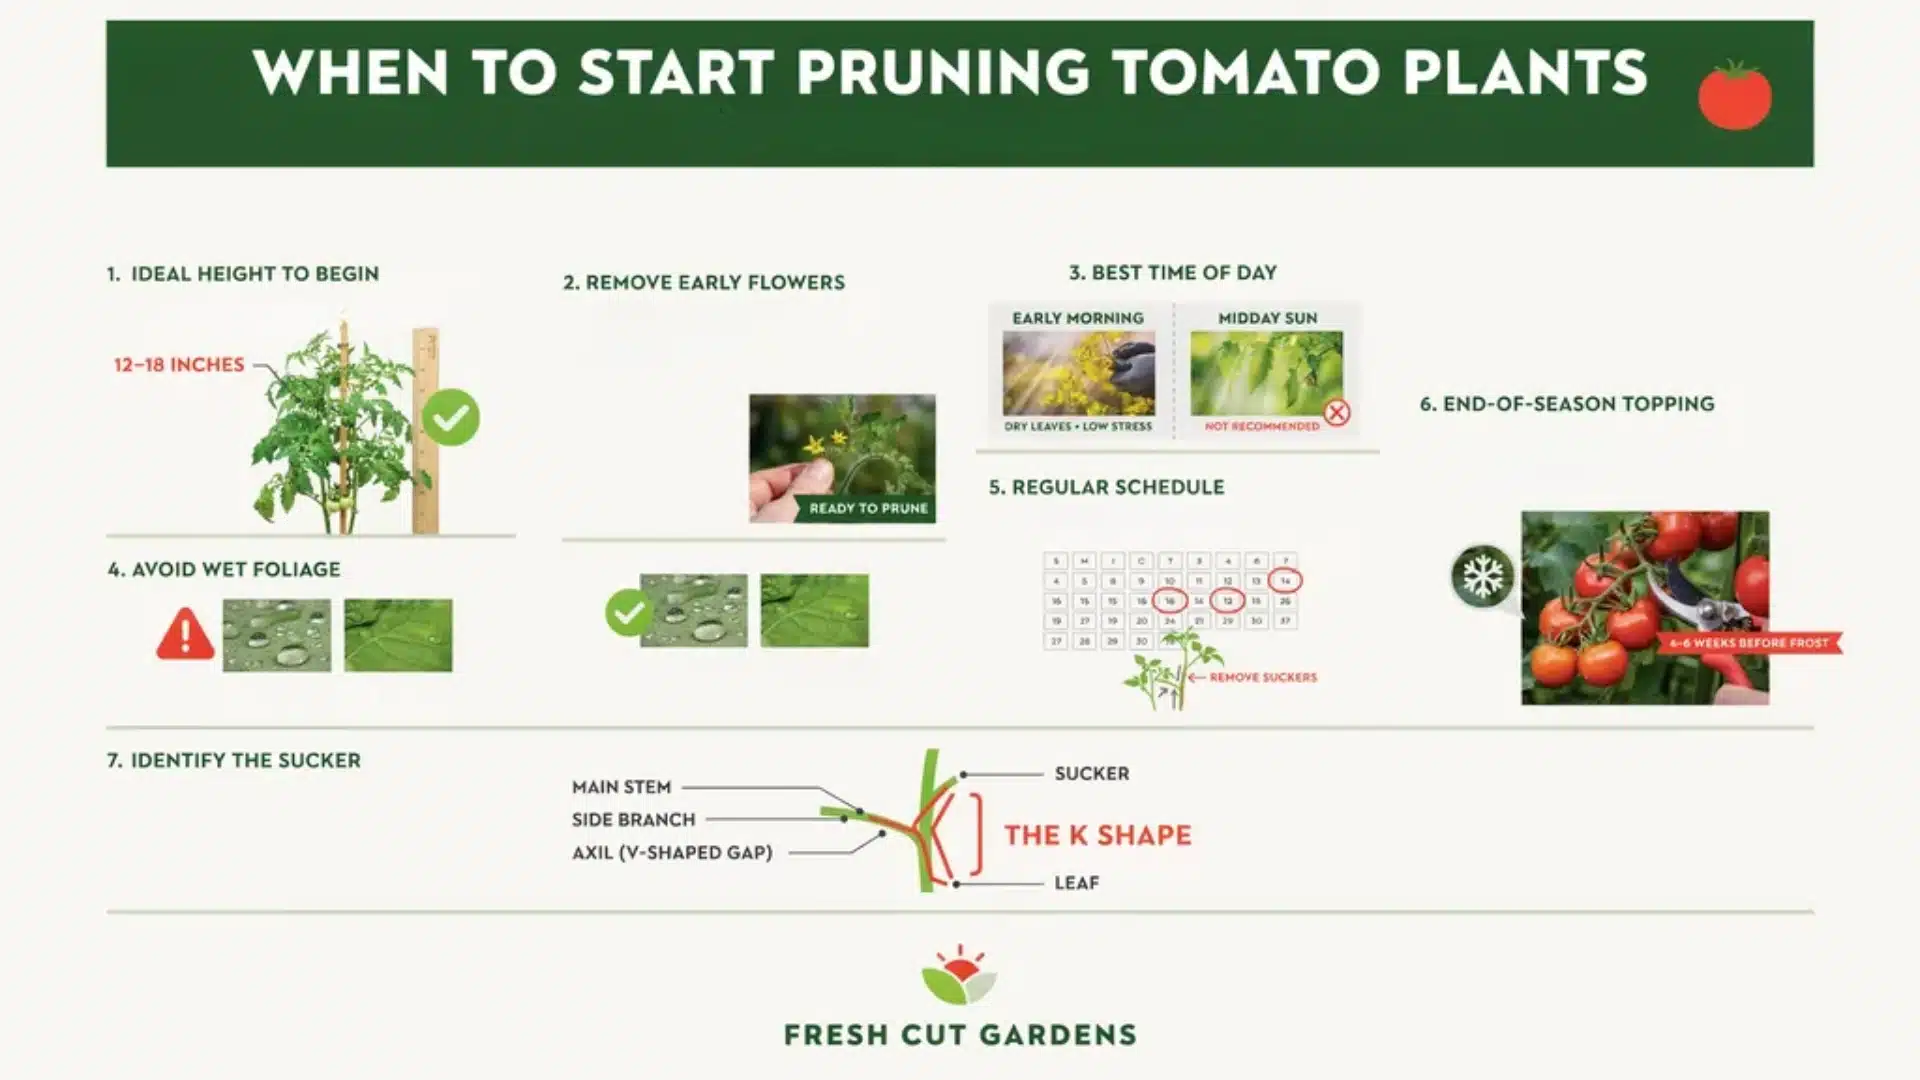
Start when your plant reaches 12 to 18 inches tall. At this size, it has enough root development to handle the stress of losing some growth.
The University of Wisconsin Extension recommends beginning the first pruning pass in late June or early July, when the first flowers open and suckers are easy to spot. Before the plant reaches this height, remove any flowers that form so it builds its root system first.
Time of day matters too. Prune in the early morning after the dew has dried, but before the heat of midday. Pruning in hot sun exposes fresh wounds to stress.
Pruning when the foliage is still wet from rain or irrigation spreads disease. Always wait for the plant to dry out first.
For indeterminate varieties, plan to prune every 10 to 14 days throughout the growing season. New suckers appear constantly, and small ones are much easier to remove than large ones.
As the season winds down, stop the top of the plant about 4 to 6 weeks before your first expected frost. This tells the plant to stop producing new growth and finish ripening the fruit already on the vine.
How to Identify Suckers?A sucker is the small shoot that grows in the “V” shaped gap between the main stem and a side branch. This gap is called the axil. Suckers point slightly upward. Leaves point outward or slightly downward. Together with the main stem, they form a shape like the letter K. That K shape is what you are looking for each time you inspect the plant. |
Four Tomato Pruning Methods to Choose From
The best method depends on your tomato type, your support setup, and your climate. These four techniques cover almost every home-garden situation.
1. Method 1: Single Stem (Best for Staking or Tight Spaces)
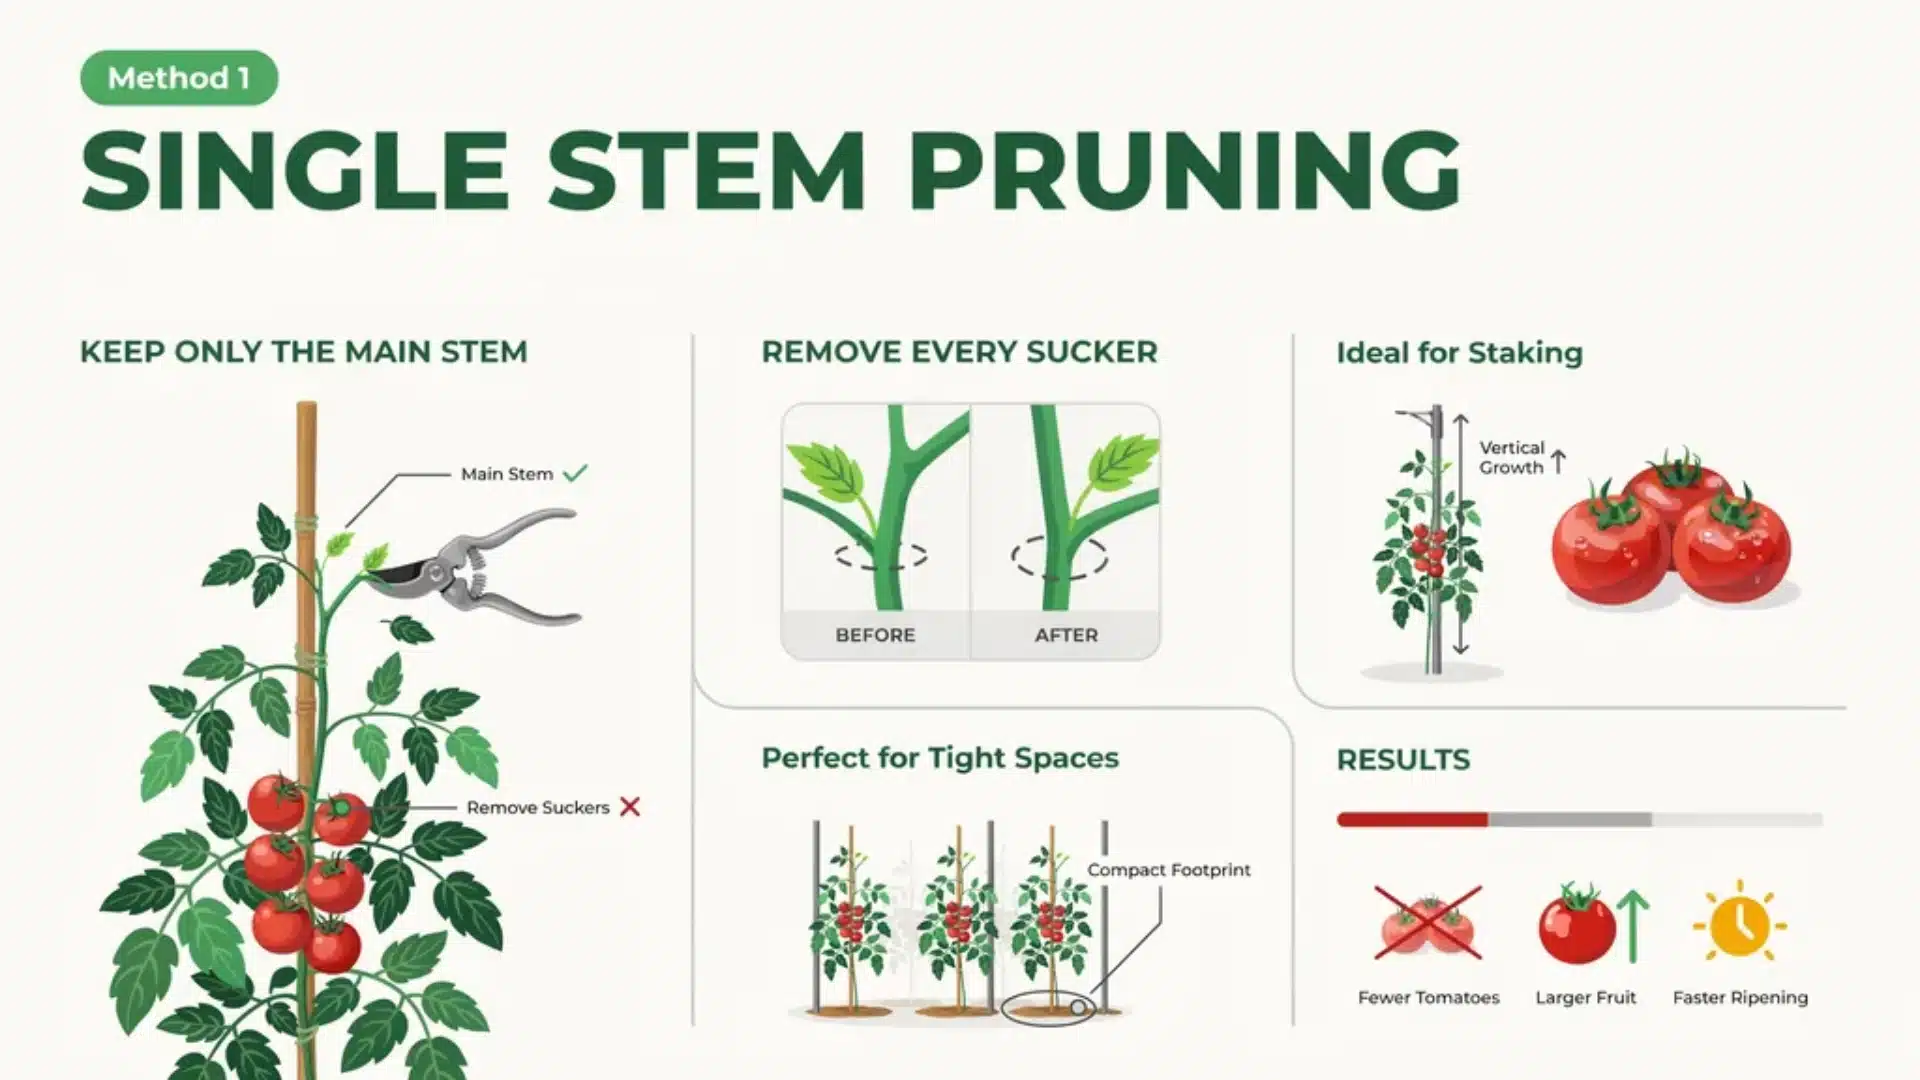
Keep only the main stem. Remove every sucker as it appears. This method works well for greenhouse growing and for gardens where plants are staked and spaced closely together.
It produces fewer tomatoes overall, but they tend to be larger and ripen faster.
2. Method 2: Two Stem (Best for Most Home Gardens)
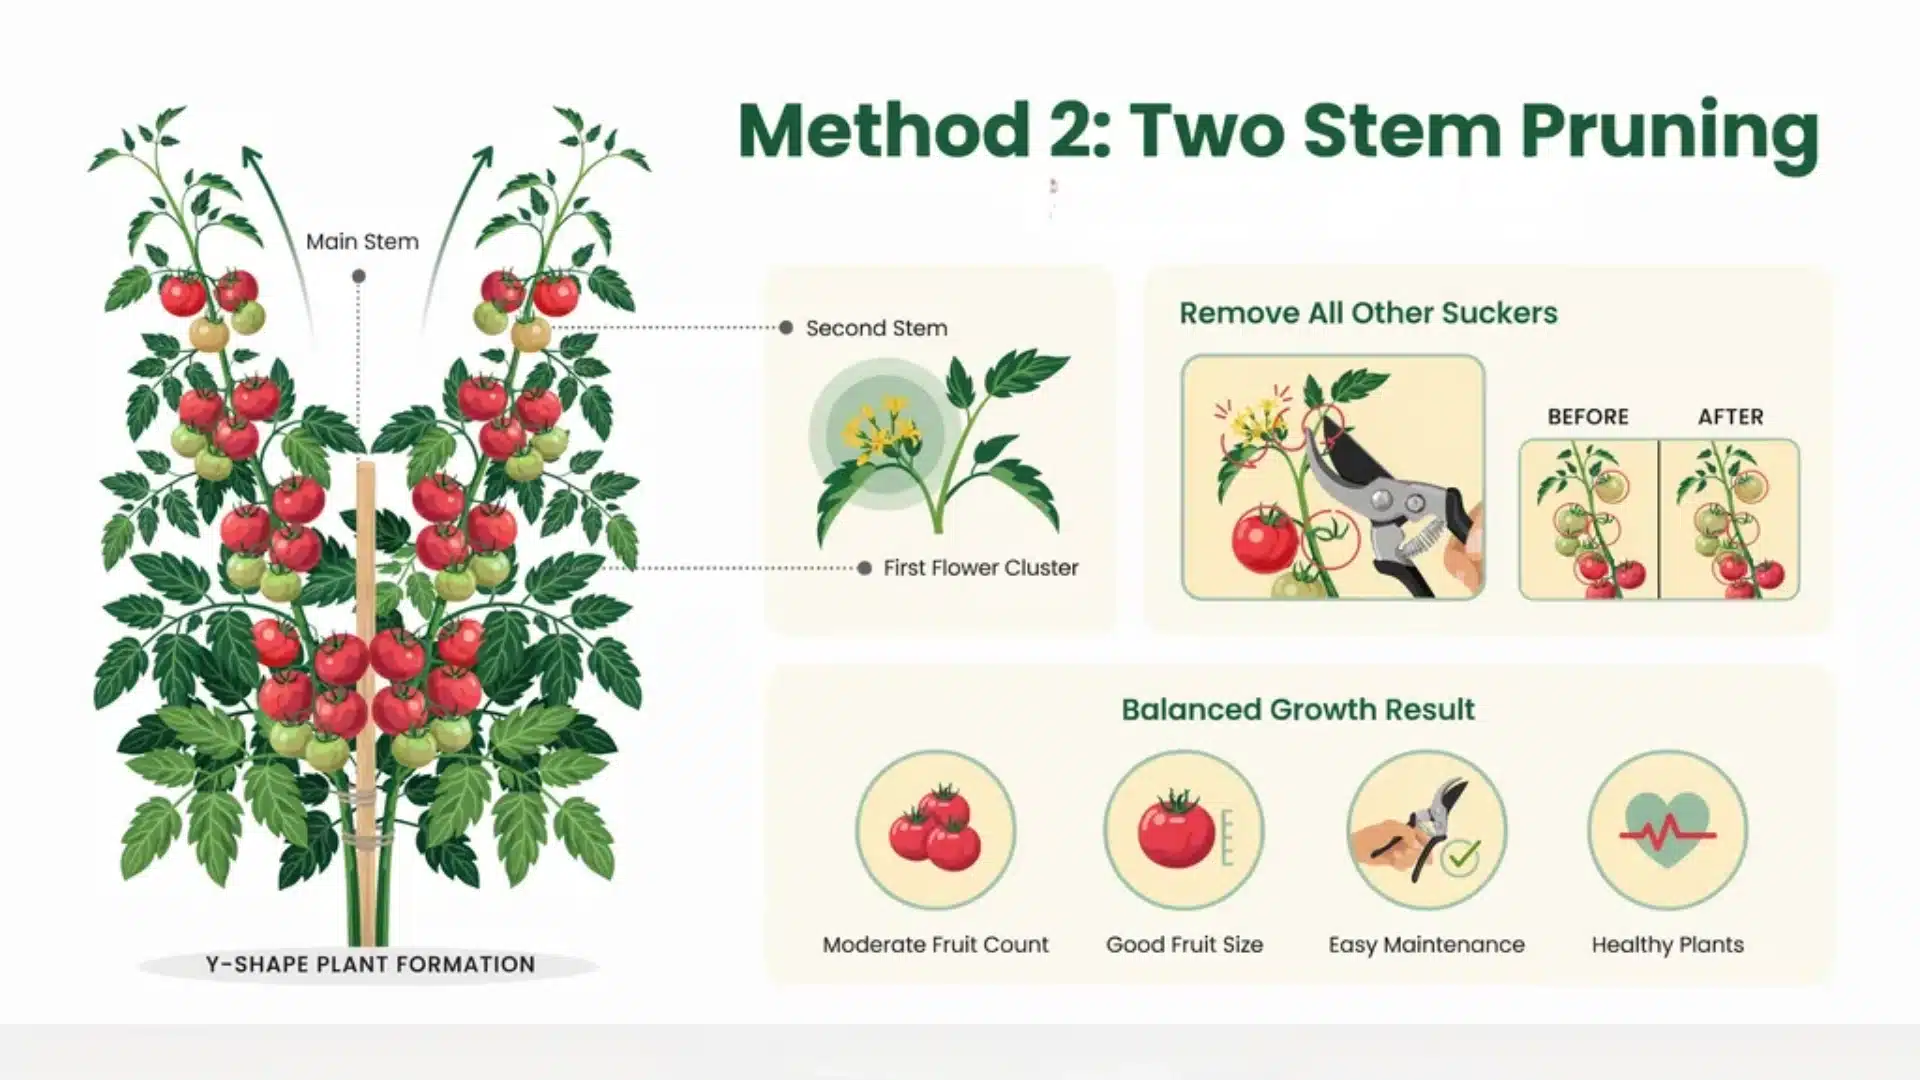
This is the method I use in my own backyard beds. Keep the main stem and allow the first sucker that grows just below the first flower cluster to develop into a second main stem.
Remove all other suckers. The plant takes on a Y shape and balances productivity with manageability.
3. Method 3: Missouri Pruning (Best for Hot, Sunny Climates)
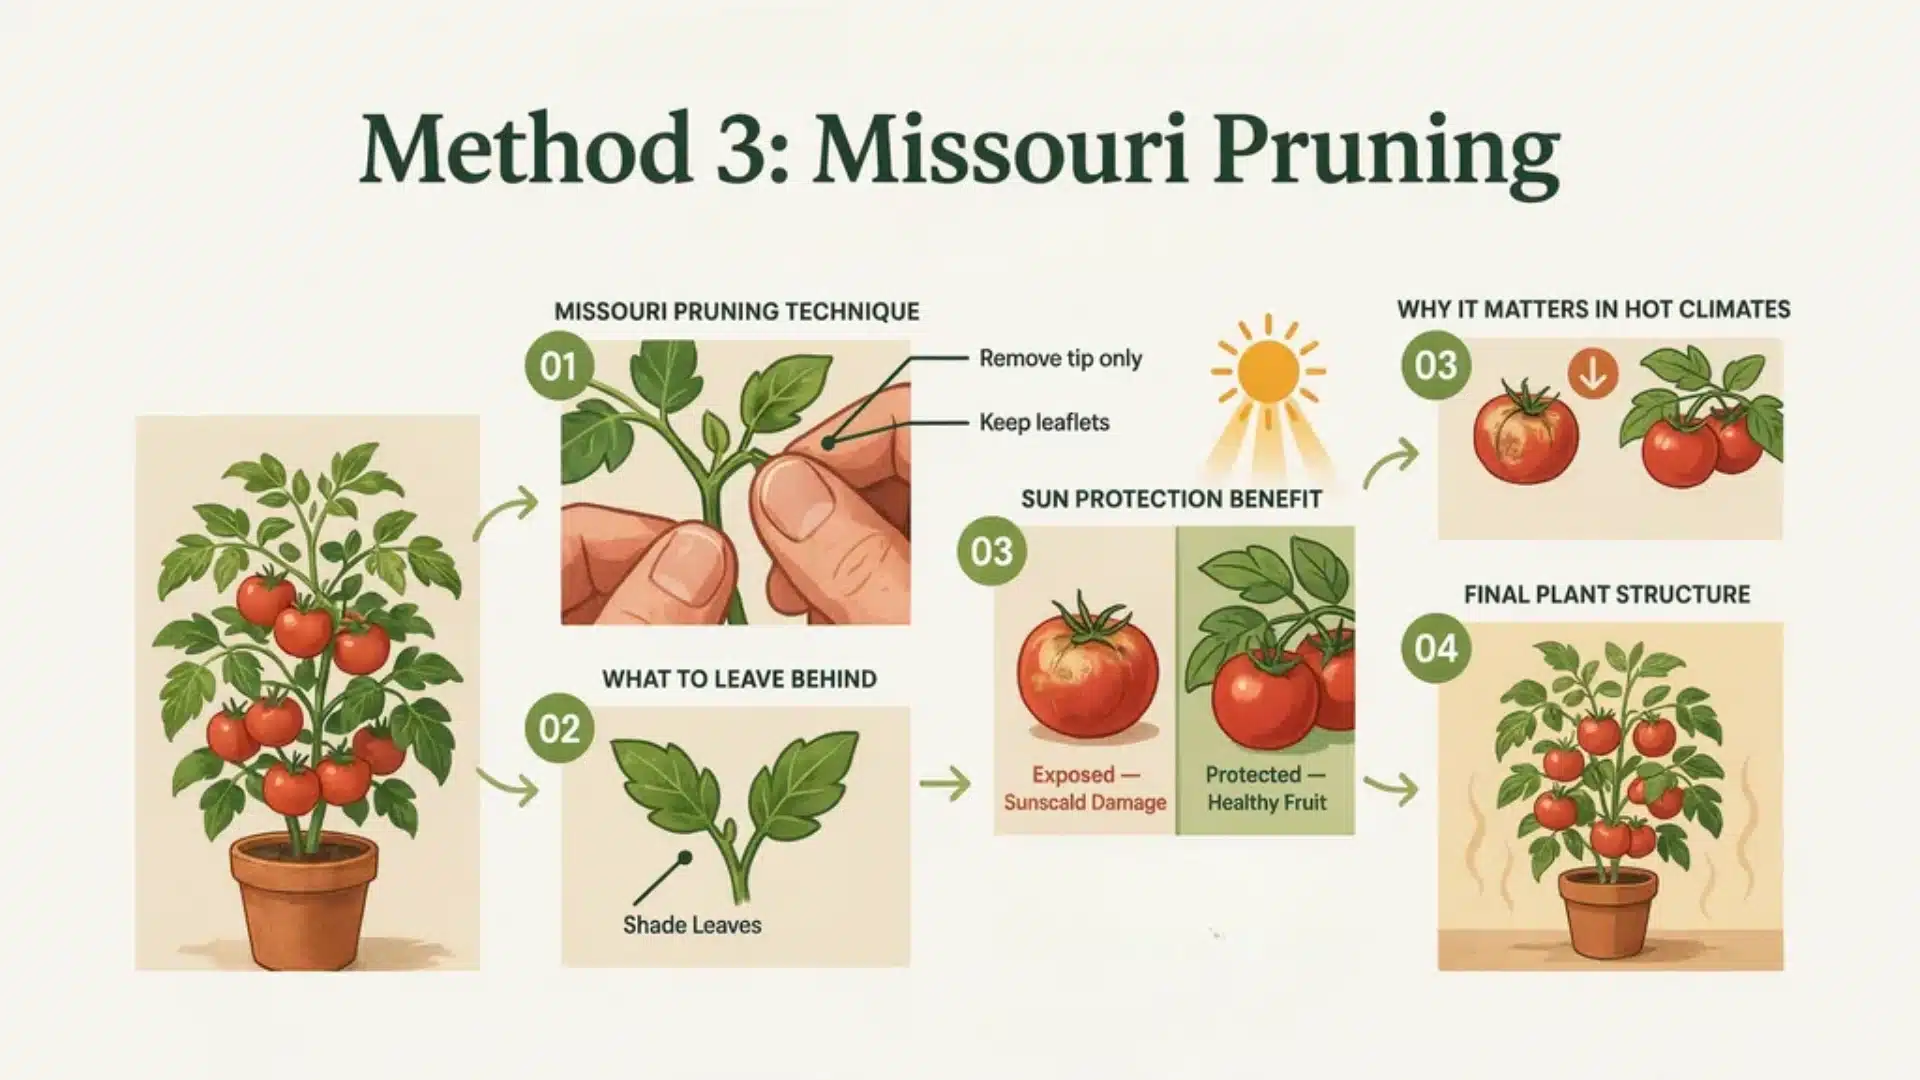
Instead of removing the entire sucker, pinch off only the growing tip at the end. Leave the two base leaflets in place.
Those leaves provide shade over the fruit and protect it from sunscald, a condition where fruit develops tough, discolored patches from too much direct sun.
If you garden in an area with intense summer sun, this method protects your fruit better than full sucker removal.
4. Removing Lower Leaves (All Tomato Types)
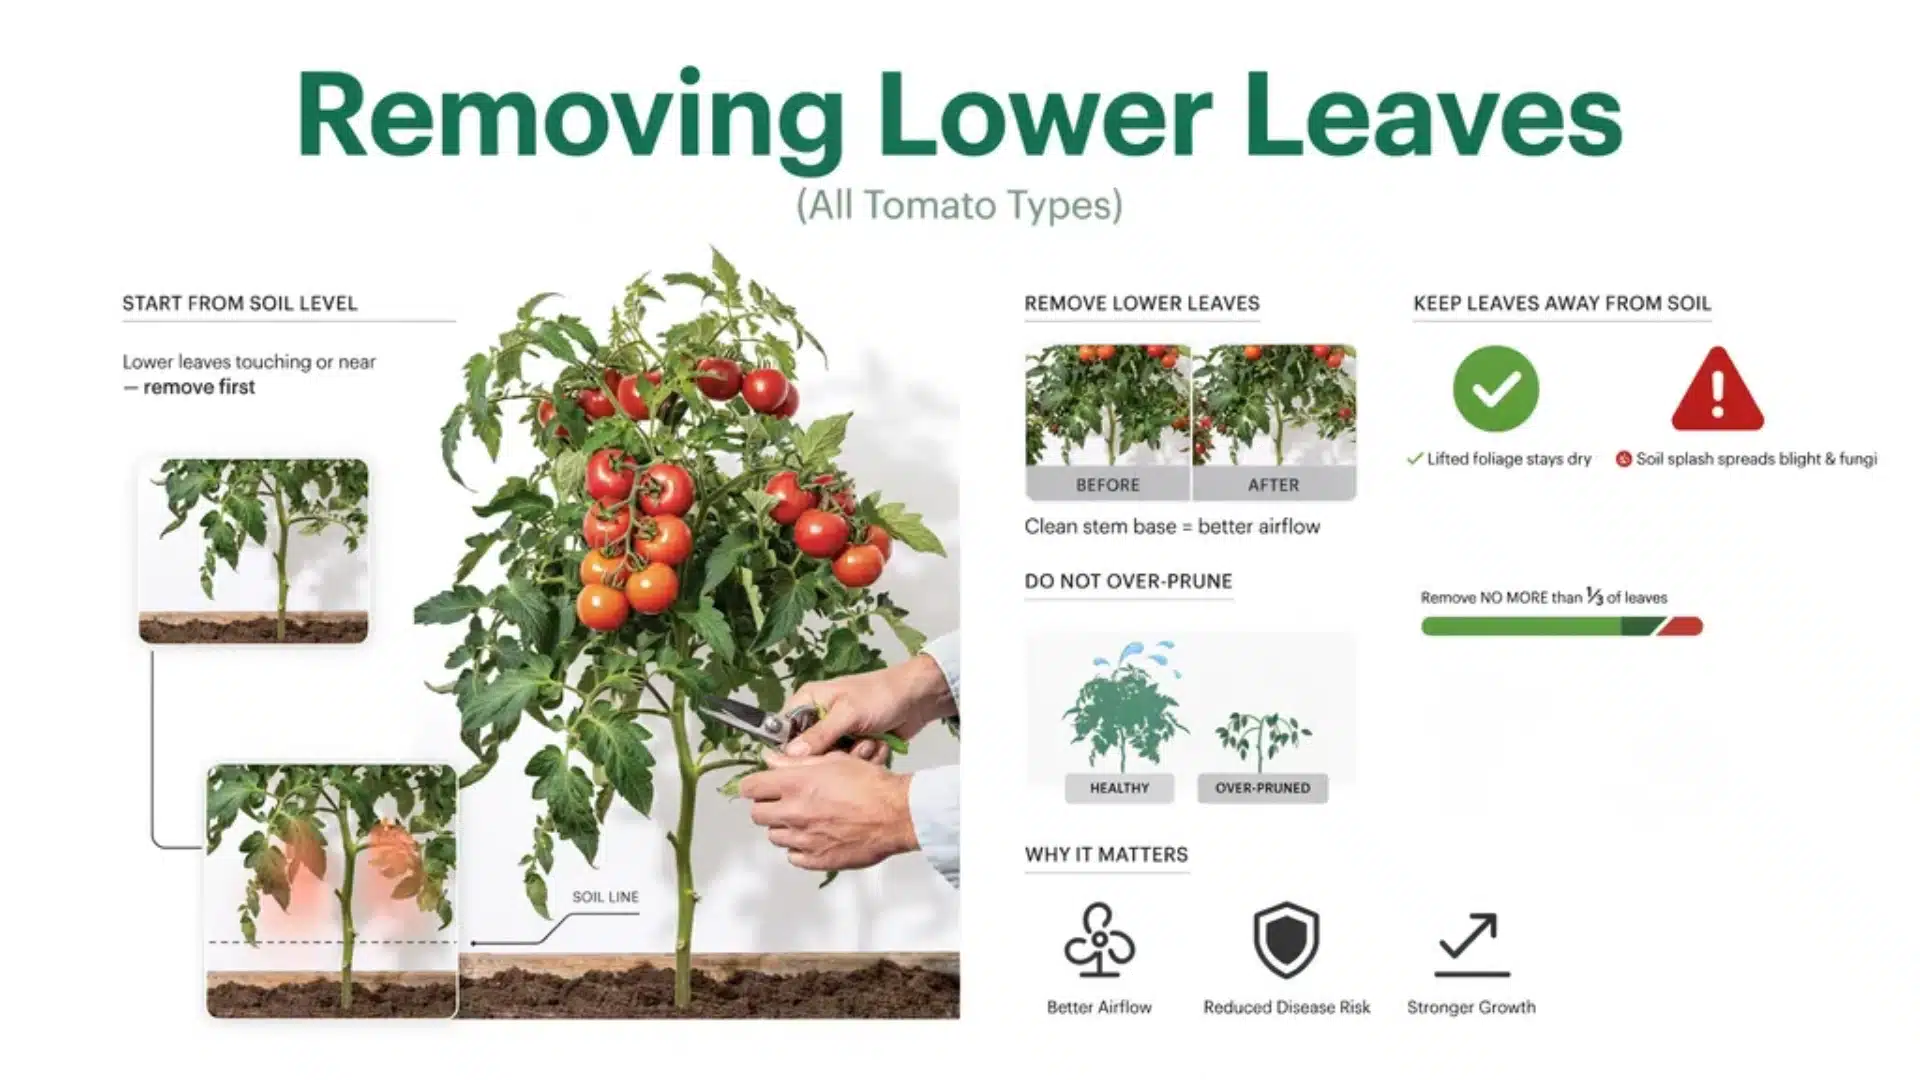
Regardless of which method you choose, remove the leaves on the bottom section of the plant throughout the season. Start from the soil level and work upward.
Keep leaves away from the soil surface. Never remove more than one-third of the plant’s leaves in a single session. Removing too much at once disrupts photosynthesis and weakens the plant.
5. Topping the Plant (End of Season)
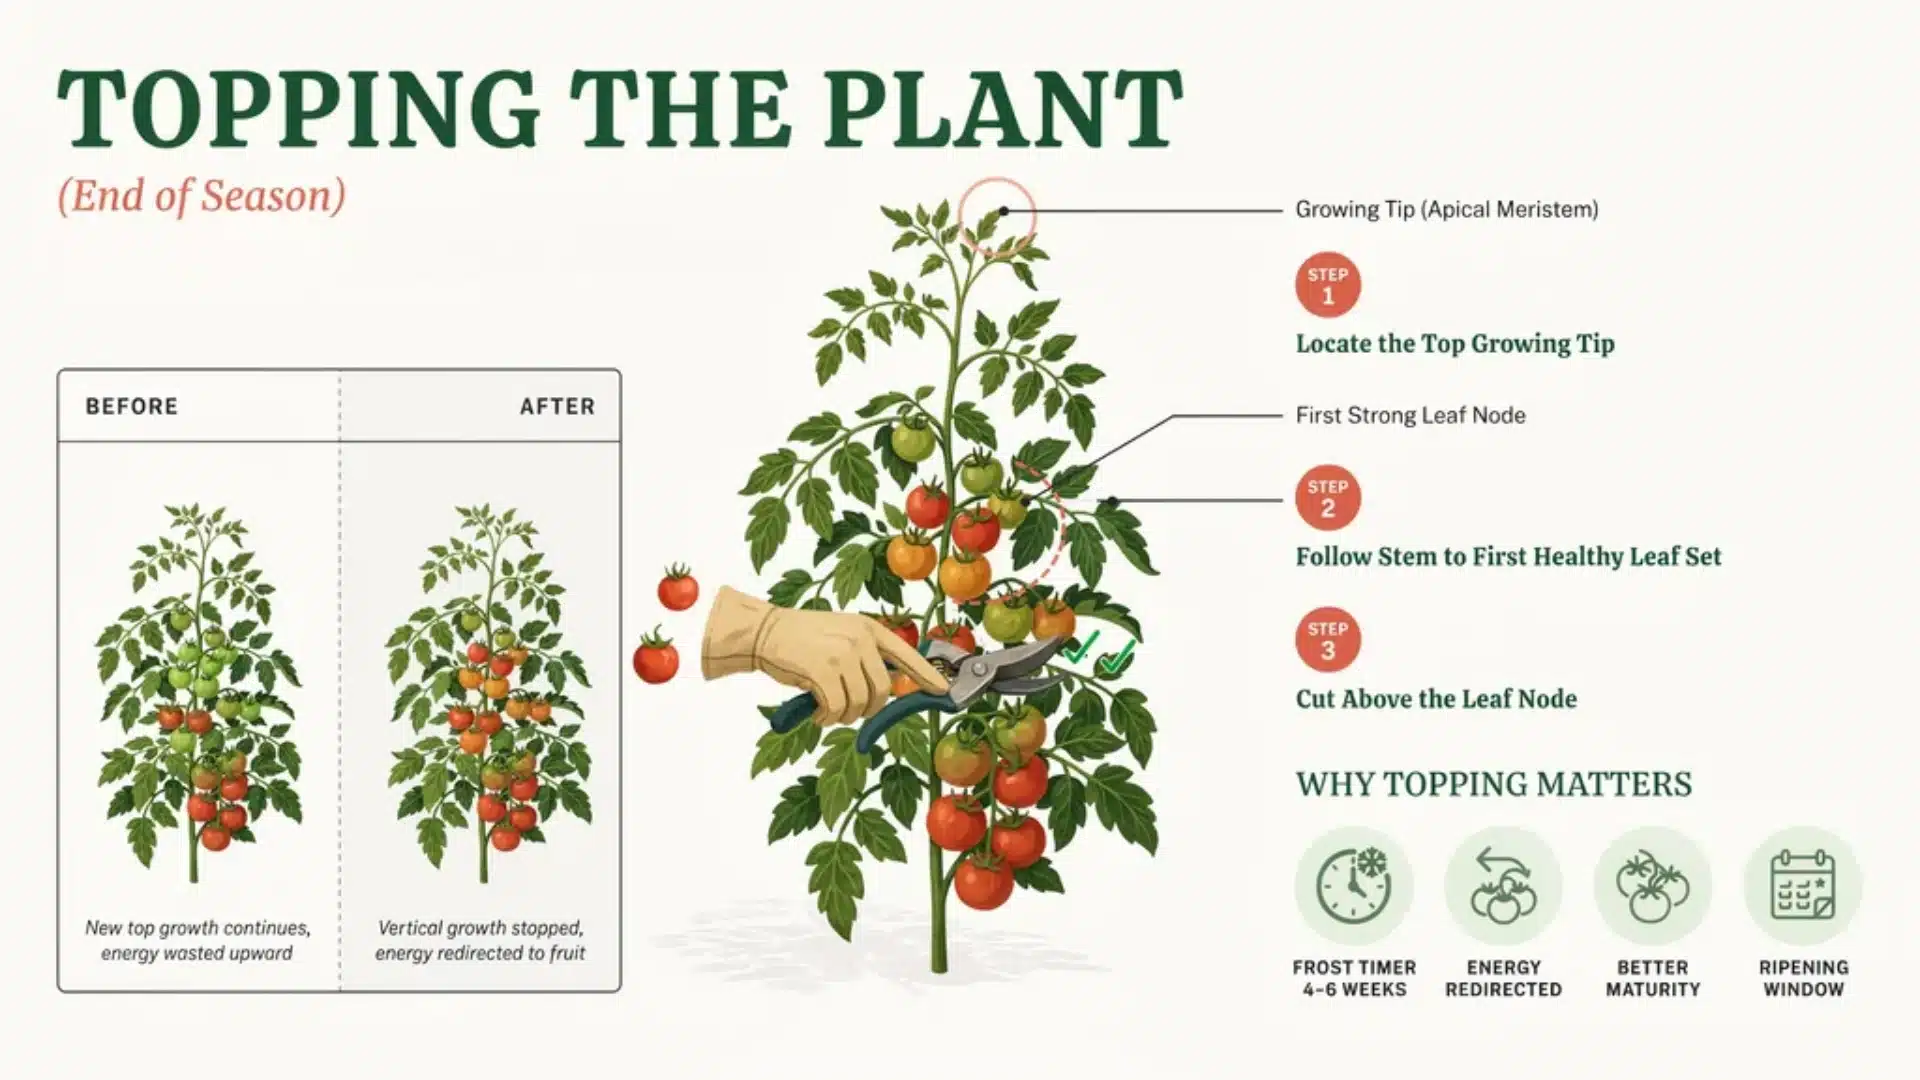
Find the top growing tip of the main stem. Follow that stem down until you reach the first fully developed, healthy set of leaves.
Cut just above that point. This stops the plant from putting energy into new growth it will never have time to ripen before frost.
Pruning Tomato Plants in Containers
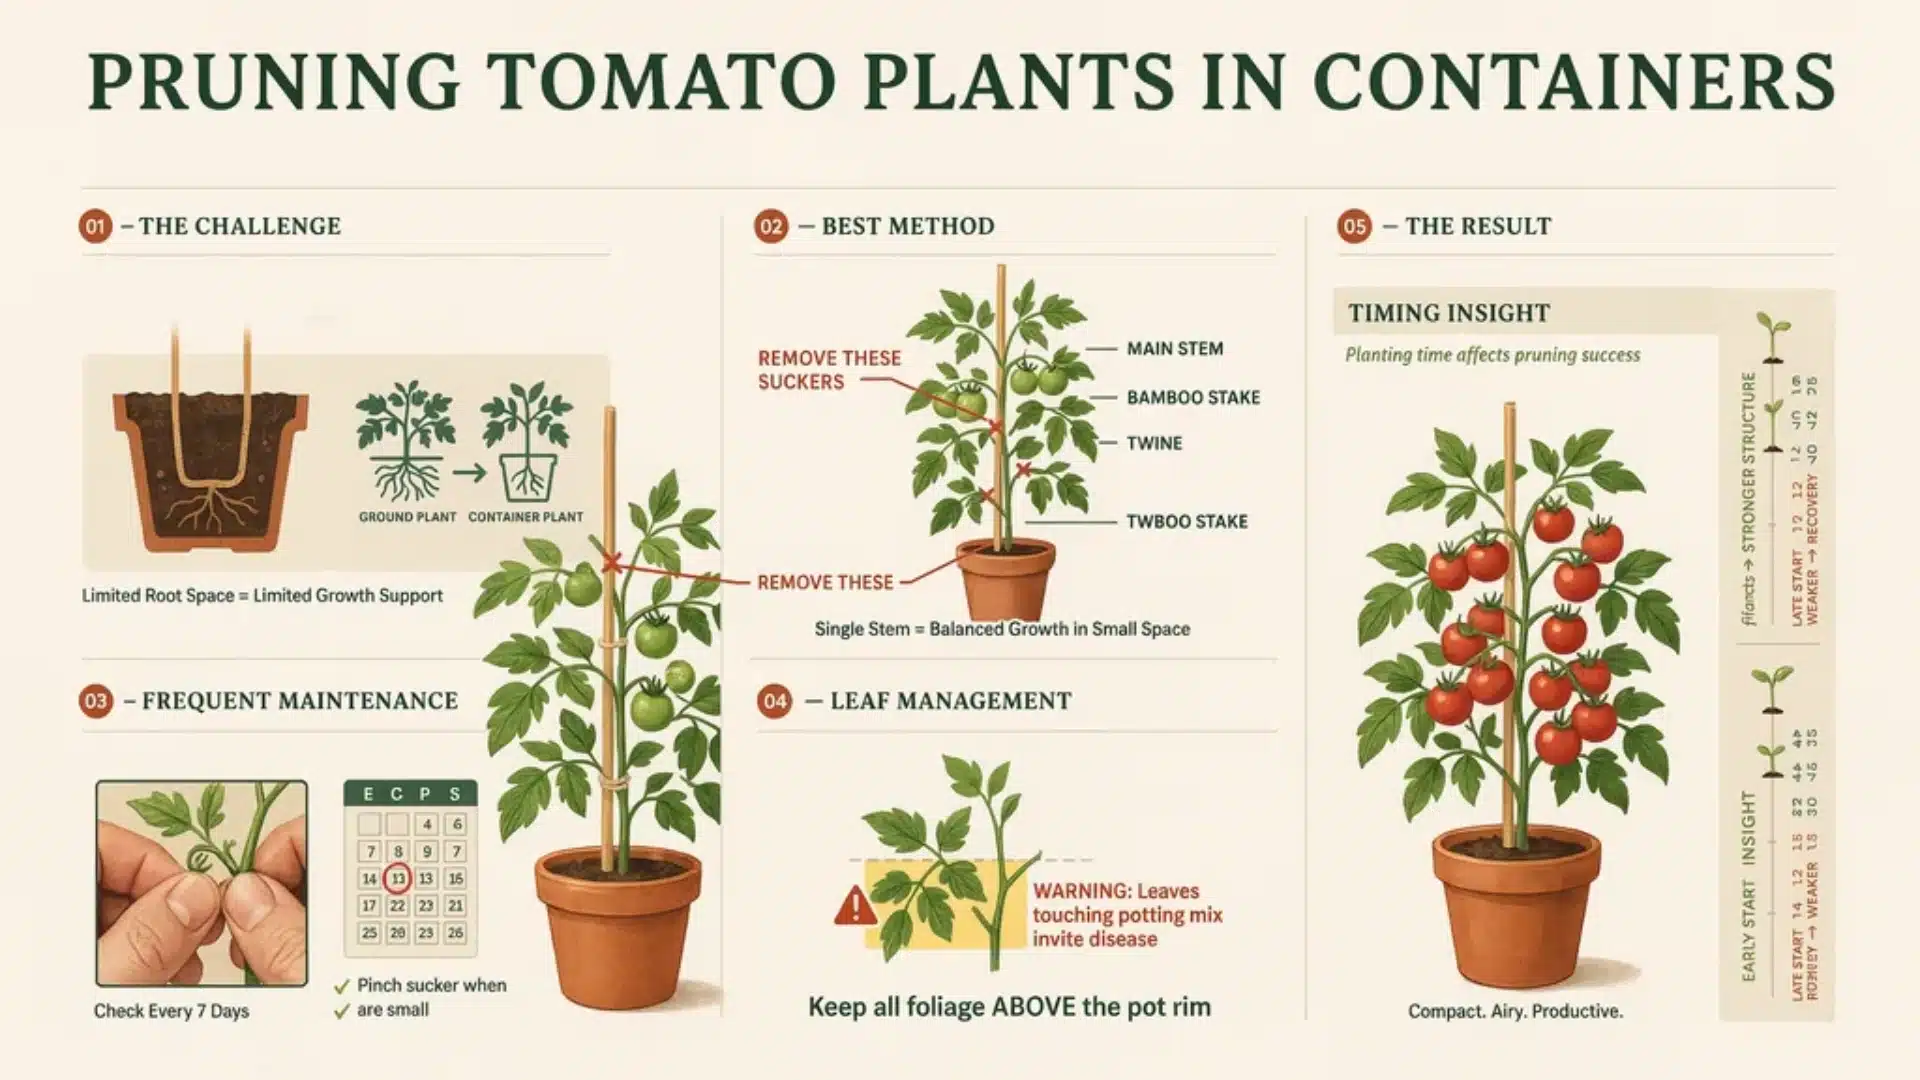
Container growing changes the rules a bit. The root zone is smaller, so the top-growth budget shrinks with it.
When a tomato grows in a pot, its root space is limited. That also limits how much the plant can support in terms of stems and foliage.
The single-stem method works best for container tomatoes because it keeps the total plant load manageable within the restricted root zone.
Remove suckers more frequently than you would for a ground-planted tomato. Check every week. Lower leaves still matter. Keep them off the rim of the container and away from the potting mix surface.
Container tomatoes that go in too early or too late already start behind, and the timing of your planting makes a bigger difference to your pruning results than most people expect.
6 Pruning Mistakes That Hurt Your Harvest
Good pruning technique takes minutes to learn. These six mistakes are what undo it, and most of them are easy to miss until the damage is already done.
1. Pruning determinate plants above the first flower cluster: This directly removes fruit. Determinate plants have a fixed structure, so cutting them back costs you tomatoes.
2. Taking off more than one-third of the leaves at once: The plant needs leaves to photosynthesize. Strip too many in one go, and the plant goes into stress, leaving fruit exposed to sunscald.
3. Using dirty or dull tools: Dirty blades spread disease. Dull blades crush stems. Both outcomes cause more damage than the pruning itself.
4. Pruning when the plant is wet: Cutting surfaces on wet foliage is an open door for fungal infections. Always wait for the plant to dry completely.
5. Pruning in the middle of a hot day: Fresh cuts in intense heat cause unnecessary stress. Morning pruning gives wounds time to begin healing before temperatures climb.
6. Leaving trimmings on the ground near the plant: Diseased cuttings sitting in the soil can reinfect the plant or carry disease through winter into next year’s crop. Remove all trimmings from the garden bed right away.
After Pruning: What to Do Next
In the 24 to 48 hours after a pruning session, check for any signs of wilting or unusual yellowing. A small amount of drooping is normal as the plant adjusts. Persistent wilting warrants a closer look.
Water at the base of the plant, never from above. Wet foliage after pruning keeps those fresh wounds damp, which is exactly the condition diseases prefer.
Dispose of all cuttings away from the garden. Do not compost material that shows any sign of disease.
Pairing your tomatoes with the right tomato companion plants naturally reduces pest pressure and keeps the patch healthier between pruning sessions.
Learning how to prune tomato plants is less about cutting a lot and more about cutting smart. Identify your tomato type first. Use clean, sharp tools. Keep sessions to a morning routine every two weeks, and never take more than a third of the foliage at once.
Plants raised from tomato seeds started indoors arrive in the garden stronger, so they handle the stress of early pruning much better.
Got a pruning question about your specific variety? Drop it in the comments.
Frequently Asked Questions
Can you prune tomato plants too much?
Yes. Removing more than one-third of the foliage in a single session stresses the plant and exposes fruit to sunscald from too much direct sun.
Do cherry tomatoes need the same pruning as beefsteaks?
Most cherry and beefsteak varieties are indeterminate, so treat them the same way. Check the plant tag first to confirm the type before pruning.
Will pruning make tomatoes ripen faster?
Yes, especially when you top the plant 4 to 6 weeks before first frost. The plant stops making new growth and finishes ripening what is already on the vine.
Should you cut off the bottom branches of tomato plants?
Yes. Remove any leaves within 6 to 12 inches of the soil to improve airflow and cut the path fungal diseases use to reach the plant.